Tutorial: Tips and Tricks for the Recorder Module
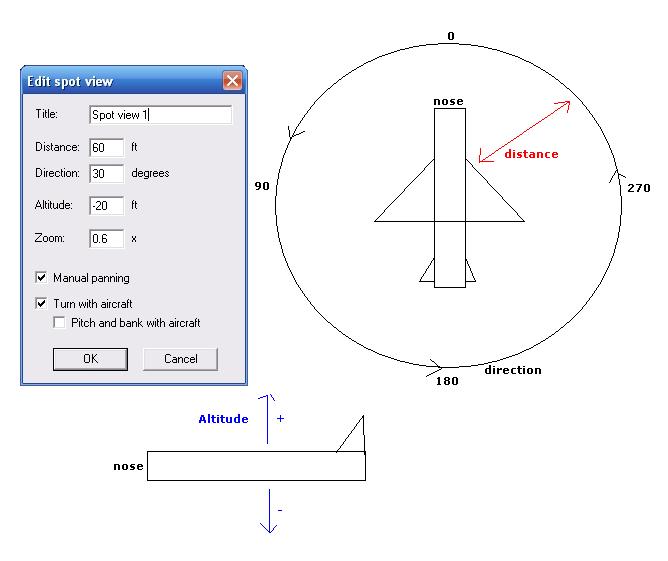
Advanced spot viewI've noticed that a lot of people are having trouble understanding the functions of the recorder modules' 'advanced spot view'. Hopefully this diagram will help people understand what the different settings actually are and how they affect your shot.

The distance is literally the distance away from your plane the camera is.
The altitude is the distance above of below the plane the camera is.
The direction is the camera angle.
Just experiment with the settings. You can create some spectacular angles.
Note: you can leave the zoom as it is. It can be changed when you're flying using the + and - buttons on your keyboard.
Advanced tower viewJust a tip for using the 'advanced tower view'. The easiest way to set a tower view is as follows:
1: slew to the place where you want the tower view to be.
2: make sure that the recorder is set on 'fs spot view' (Alt-recorder-advanced spot view) and that the tower is set to 'fs tower view' (Alt-recorder-advanced tower view).
3: switch to spot view and select Alt-recorder-advanced tower view-new tower view. Click ok and the tower view will be in the correct location!
Quick and Easy Formation FlightNote- for this part you need to have the latest release of the recorder module (
www.fs-recorder.net) and a decent knowledge of fs9's slew function.
One of the best features of the recorder module is its ability to record a flight and have it playback as traffic. Enabling you to fly in a formation easily. This is a quicker and easier way of creating a formation without having to fly each individual aircraft (for screenshot use only). It's a good idea to know what formation you want to fly before starting out (particularly for large formations).
1: select your desired aircraft and location from the fs9 menu. Takeoff and fly to the position that you want to create your formation in (make sure the scenery is nice for your shot).
2: Press slew (by default it's y) and perfect your position the pause the sim.
3: Click on 'Record' under the recorder menu (alt-recorder-record). Click OK. Unpause the sim but STAY IN SLEW MODE!
4: Under 'options' change the simulation rate to fastest. Wait until it has been recording for 1000 seconds (will only be about 5 seconds with simulation rate on fastest) then change the simulation rate back to normal and stop the recording. Save the file. (YOU SHOULD BE IN SLEW MODE ALL THE TIME!)
5: Switch to the aircraft that you want to be the second aircraft in your formation. (Make sure you have aircraft collisions turned off).
6: Select 'play as traffic' from the recorder menu and choose the file you have just saved.
7: Use slew to move your second aircraft into the correct position (remember - NEVER COME OUT OF SLEW MODE!).
8: Stop the playback and record the aircraft in its new position for 1000 seconds. Stop recording and save the file. Make sure you change the simulation rate back to normal.
9: Switch to your third aircraft and select play as traffic. Use ctrl to highlight your previous two flights and click ok.
10: Get your third aircraft into position.
You can continue the same process for as many aircraft as you want but for this shot im only doing three.
To take the shot...Once you have all aircraft in the formation you can (if you havn't already) adjust the weather and time settings (but stay in slew!).
Once everything is correct pause the sim and come out of slew mode. To take the shot without the 'simulation' paused' message you will have to time it so that you take the shot when the message is not flashed up. Take a few to be sure you have it right. You can also use the advanced spot view to get a better angle.
Here's one i made earlier:

Cheers, hope this helps!
Note: I'd just like to say i didn't use this method for my October contest entry (the one with Concorde and the Reds). I actually did fly every aircraft


