Search the archive:
YaBB - Yet another Bulletin Board


Page Index Toggle Pages: 1
Send Topic Print
Cockpit Construction Continued (Part 21) (Read 3053 times)
Jul 11th, 2005 at 11:17am

JBaymore   Offline
Global Moderator
Under the curse of the
hombuilt cockpit!

Gender: male
Posts: 10261
*****
 
First Test of New Hagstrom KE72 Encoder

I mentioned earlier in the threads that I had received my new keyboard encoder in the mail.  Over the last couple of days I finally had a chance to do the first testing of the brand new Hagstrom KE72 Keyboard Encoder card in the simpit.  (Note: link to their site in sticky "Resources" listing at top of forum)

The KE72 is a device that "emulates" a keyboard.... but it is much more than that.  It is fully programable on each of its 72 discrete inputs ... and can even send a long "macro" on either the making or release of a switch.  It can handle momentary, toggle, pushbutton, rotary, and other types of switches.


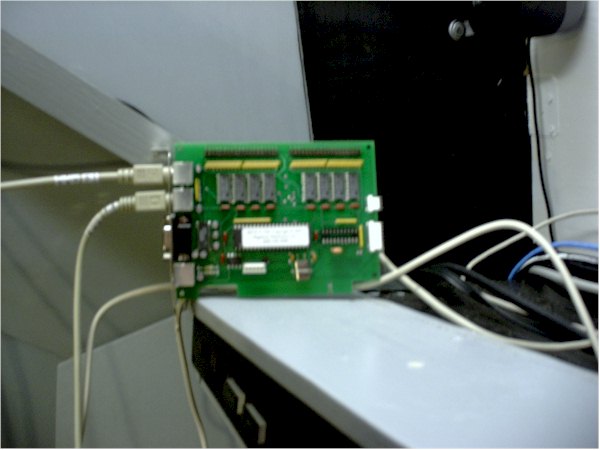
In the photo below you see the small Hagstrom KE72 (without trackball interface):
...

While it looks like it plugs into a PCI slot..... that is just one possibility for mounting; it makes no conncetions that way.  There are also holes in the corners for mounting.  The two wires top the top left are the keyboard port connection from the computer to the card and the card back to the main computer keyboard.  The two black strips at the top center are the headers for the 72 switch inputs plus logic grounds.  This is where the breakout boards plug in.  There is also a com port conncetion and a connection for the keyboard leds.


The first panel in the pit that I wired up was the external lights panel on the overhead which sits just over the captian's side of the windscreen.  On my pit this panel has landing lights, taxi lights, nav lights, beacon lights, strobe lights, logo lights, wing lights, and exit lights.  

All of the inputs on the KE72 share a common ground.  The switches are activated by shorting them to the ground.  So a single wire goes to each switch and the other leg is tied to ground.  So seven switches takes only 8 total wires.  I used CAT 5 network cable for this panel... and the wire count in that cable still leaves one switch (exit lights) to wire up later.

The CAT 5 wires were soldered to the appropriate switches.  Hookup to the KE72 end is a snap using the breakout boards Hagstrom sells.  They bring each input out to a labeled (numbered) screw terminal connection.  Hookup is only a matter of putting the wire in the terminal and turning a screw.

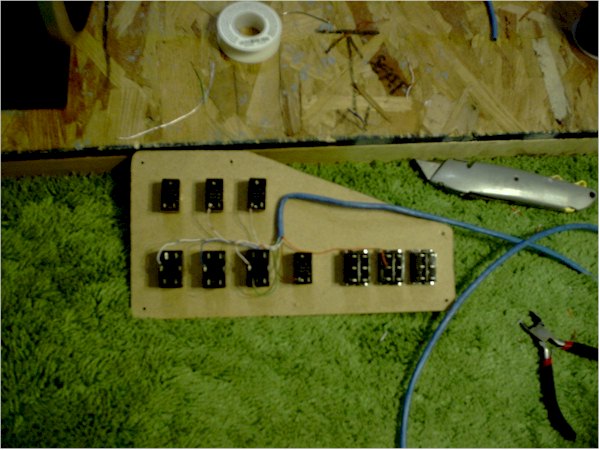
Here is the rear of the external lights switch panel with the wires in place to interface to the KE72.  Simple!
...

There will be some additional wiring added to the second poles of the DPDT switches later.  I will power a couple of appropriate colored flashing ultrabright LED's off the other side of stuff like the strobe and beacon switches.  These leds will be positioned in the pit to simulate a very slight reflection of the external flashing lights that will be seen inside the cockpit.   Cheesy


To get the KE72 encoder to work you have to program a configuration file so that it knows what you want each switch to do.  This programming is pretty simple.  Here is an example of the .txt file that needs to be created:

IN01: [O]     This assigns input #1 to output the "O" key when pressed.

IN01|[Z]       This assigns input #1 to output the "Z" key when released.

IN02: [(+)Ctrl][W][(-)Ctrl]  This assigns input #2 to output  Control "W" when the key is pressed.

I bet from the above examples you can already figure out how to program the input #2 to output the Control "Q" key when released  Wink.  See how simple that is.

Just be sure to check your syntax (typos) well.  I had a devil of a time for a short with a couple of inputs until Dave at Hagstrom found my simple misplaced parentheses sigh that I somehow did not see after re-reading the code over and over  Embarrassed.  Have to mention that Hagstrom was VERY fast to respond to my question...and found it immediately.

Then you tell the KEYLOAD72 program to send the configuration file to the encoder via the keyboard port line.  Takes a minute........ and done.  it is non volatile.... only update it if you want to change things

Then you fire up the sim itself and the key sequences that are "native" to the simulator will work when you throw the appropriate switch.  This is like
MAGIC
the first time you do it!  Shocked  Reach up to the overhead and flip the landing lights switch when in the full screen, no panel view..... and bingo,.... lights appear on the runway.  

Many key sequences that the sim does not support in a native mode are assigned via using FSUIPC's key mapping function.  An example is the separate wing or logo lights.  You map the output of the switch throw from the KE72 ........ let's say outputting Control +Shift+ "W"...... to be recognized by FSUIPC and then assign that to the variable that FSUIPC has that is for "Wing Lights".  This is basically done via a key press sensor and then a drop down menu of choices in FSUIPC.

Exit the FSUIPC setup function and go try it in the sim.  Bingo!


Folks...... even if you don't build a full scale simpit.... this unit would make a GREAT addition to even a simple desktop setup with some real switches scattered around.  With 72 inputs... when you take out all the buttons you already have for joysticks and throttles.... you can easily eliminate the keyboard for basic flying.

best,

......................john
« Last Edit: Jul 11th, 2005 at 12:23pm by JBaymore »  

... ...Intel i7 960 quad 3.2G LGA 1366, Asus P6X58D Premium, 750W Corsair, 6 gig 1600 DDR3, Spinpoint 1TB 7200 HD, Caviar 500G 7200 HD, GTX275 1280M,  Logitec Z640, Win7 Pro 64b, CH Products yoke, pedals + throttle quad, simpit
IP Logged
 
Reply #1 - Jul 11th, 2005 at 11:41am

JBaymore   Offline
Global Moderator
Under the curse of the
hombuilt cockpit!

Gender: male
Posts: 10261
*****
 
Getting Some Air Moving!

Flying in an enclosed cockpit deals with a lot of "real cockpit" issues.  One of them is climate control.  So I will be putting in a number of real ventialtion / heating options.

One of the few "real aircraft" parts in the pit is some overhead ventilation units bought off EBay.  They got painted to match my pit color scheme (they were Boeing Brown).  Then I had to rip out the blower guts that were powered by the aircraft's 24V source... and put in a new air supply unit that ran off the pit's 12V DC.

In the first photo you can see the vent unit, the old internal mechanism (to the left), and the cover and 12V DC blower that I added (to the right).

...


In the second photo is another view of the construction.  The "cover" is 1/4" MDF with a metal angle bracket used to mount the blower fan.  The fan is caulked to the cover with silicone caulking to seal it.  The wiring is routed thru the twist switch on the nozzle of the vent unit to turn the fan on and off.  Of course the air circulation in the "aircraft" has to be on first.. and this means that the packs and the bleed air have to be functioning...which means that at least the APU has to be running if the engines are not.

...


In photo #3 the blower unit is mounted on the the vent unit with screws.  The space will be caulked in and painted.  The vent unit is not "flat" on the bottom.

...


In the next picture you can see the roof panel cut out to accept not only this vent unit, but a second set of reading lights.

...


Here below the two units are mounted on the roof panel facing:

...


And here is the reverse side of the roof panel facing:

...


And in the last shot below you can see what it looks like in the simpit.  The nozzle is rotated to turn on the vent.  The vent nozzle is able to be positioned to direct the airflow wherever you want it to go.

...


It is moving along... and the closer it gets... the slower it goes  Tongue


best,

..................john
 

... ...Intel i7 960 quad 3.2G LGA 1366, Asus P6X58D Premium, 750W Corsair, 6 gig 1600 DDR3, Spinpoint 1TB 7200 HD, Caviar 500G 7200 HD, GTX275 1280M,  Logitec Z640, Win7 Pro 64b, CH Products yoke, pedals + throttle quad, simpit
IP Logged
 
Reply #2 - Jul 11th, 2005 at 12:08pm

JBaymore   Offline
Global Moderator
Under the curse of the
hombuilt cockpit!

Gender: male
Posts: 10261
*****
 
Main Instrument Panel Lights

Below are two shots that show the 12V DC main instrument panel lights (although you can see a lot of the rest of things too):

...


...

The light units themselves are replacement automotive licence plate lights.  Wink  The lit switches on the lower left of the MIP are the controls for all the cockpit lighting..... there are separate floor, dome, reading, yoke, MIP, glare, center pedestal, and overhead light controls.

best,

......................john
 

... ...Intel i7 960 quad 3.2G LGA 1366, Asus P6X58D Premium, 750W Corsair, 6 gig 1600 DDR3, Spinpoint 1TB 7200 HD, Caviar 500G 7200 HD, GTX275 1280M,  Logitec Z640, Win7 Pro 64b, CH Products yoke, pedals + throttle quad, simpit
IP Logged
 
Reply #3 - Jul 11th, 2005 at 6:33pm

Gunny04   Offline
Colonel
Who's Better than the
best when nobodys the
best?
Michigan

Gender: male
Posts: 2101
*****
 
That looks real nice...... I wish I had that..... Cheers, Gunny  Grin
 

AMD athlon 3800 Venice Socket 939 64 bit at 2.4Ghz, 6100K8MA-RS Foxconn Motherboard, 1gb (2X512) OCZ Platinum PC3200 Ram, EVGA 8800GTS 640MB OC, 500 Watt NZXT psu, and Windows Vista Ultimate Total hard drive space 530gb
IP Logged
 
Reply #4 - Jul 11th, 2005 at 9:14pm

marick626   Offline
Colonel
Banned
Puerto Rico

Gender: male
Posts: 618
*****
 
so big a cockpit and so smal a monitor ???
 
IP Logged
 
Reply #5 - Jul 12th, 2005 at 8:47am

Mehdi   Offline
Colonel
I wish...
London, England

Gender: male
Posts: 481
*****
 
Stunning work, John, I REALLY need to save up and get over to your crib!  Grin

Marick, that monitor is only a temporary solution, I'm sure. A new screen shall find it's way into that little box.  Grin
 

...&&&&My Specs&&Intel P4 3.2GHz with HT&&ATi Radeon X800XT&&1GB Corsair RAM&&160GB Maxtor HDD&&17" TFT
IP Logged
 
Reply #6 - Jul 29th, 2005 at 6:12pm

JBaymore   Offline
Global Moderator
Under the curse of the
hombuilt cockpit!

Gender: male
Posts: 10261
*****
 
Yup.... the monitor is temporary.  It will eventualy be a projector (or a wide screen HDTV if I hit the lottery  Wink.

And thanks once again for all the kind words guys.  But anyone with the time and a few hand skills can do something like this... not to mention some disposable cash.   8)

best,

...................john


... ...Intel i7 960 quad 3.2G LGA 1366, Asus P6X58D Premium, 750W Corsair, 6 gig 1600 DDR3, Spinpoint 1TB 7200 HD, Caviar 500G 7200 HD, GTX275 1280M,  Logitec Z640, Win7 Pro 64b, CH Products yoke, pedals + throttle quad, simpit
IP Logged
 
Reply #7 - Jul 30th, 2005 at 6:32am

Stormtropper   Offline
Colonel
Blueballed...!
Grosse Pointe, MI

Gender: male
Posts: 1645
*****
 
Meh...NH ain't too far...

...can I come over? I gotta so the inverted-slice-Jared's-tail-off-with-my-prop trick in that thing! Grin

Jeff
 

Arizona State University&&Viva la party!
&&&&...
&&&&
IP Logged
 
Reply #8 - Aug 26th, 2005 at 1:02pm

|| Andy ||   Offline
Colonel
Shropshire, United Kingdom

Gender: male
Posts: 2711
*****
 
WoW..

Great work  Shocked
 
IP Logged
 
Page Index Toggle Pages: 1
Send Topic Print