Post by Hagar on Mar 20th, 2010 at 2:46pm
This is the fourth in my series of (hopefully) brief tutorials on resizing/saving images for posting here on the forum.
I'm always on the lookout for useful freeware utilities. Flying Trucker mentioned one named BD Sizer recently so I decided to check it out. Unlike more conventional graphics editing software, BD Sizer was developed specifically for processing images for posting on the Internet. A very useful piece of kit indeed. It has a few other handy features but these aren't part of this walk-through.
If you would like to try it download the current BD Sizer 3.3.0 here --> http://www.idimager.com/downloads/freeware
Installation is quick & painless. I suggest creating a desktop shortcut when prompted. Once it's set up, resizing & saving screenshots & photos for posting on this forum is quick & simple.
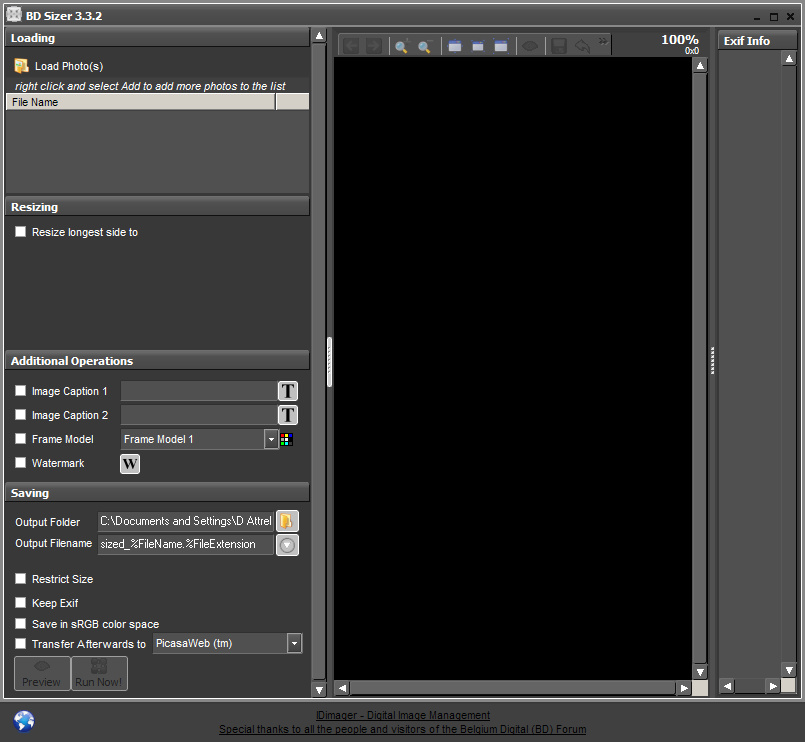
This is the user interface. It would normally fill the screen but I've reduced the size for demo purposes.
There is no conventional menu bar & the options are all in the side menu on the left.
(Close the right hand 'Exif Info' window by clicking on the button half-way down the left side.)
Browse & open the image(s) you wish to post from the Load Photo(s) icon at top left. The shot I'm using as an example was taken in FSX with the onboard screengrab option (V key).
It was automatically saved in BMP format at the native resolution of my monitor (1440 x 900 pixels) & will need resizing to meet the forum limit of 1024 pixel width max.
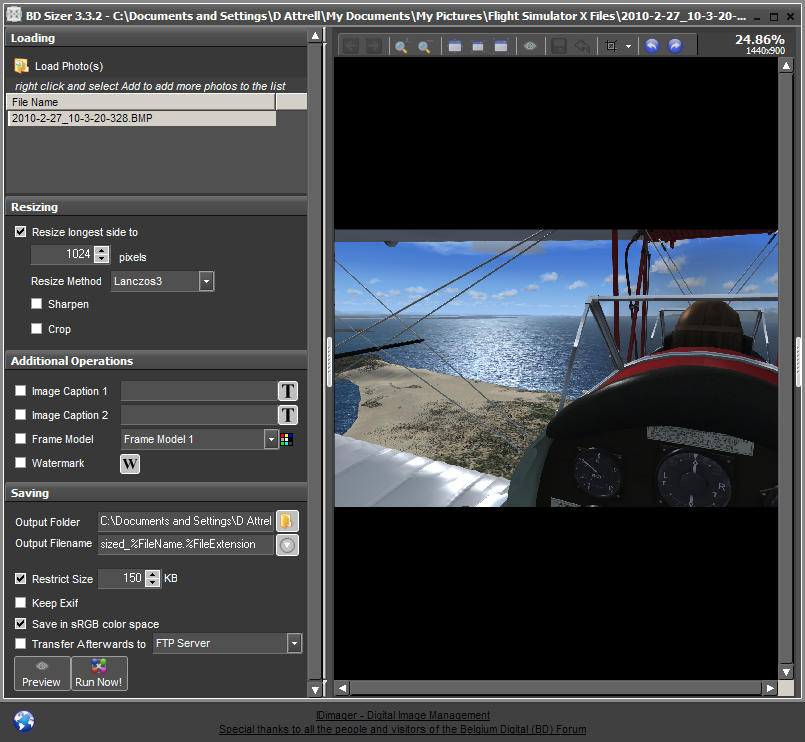
To set the resize options click the appropriate box under 'Resizing'. This will expand the menu as in the shot below.
Set the longest side to whichever width you want your shot(s) to end up. Use the up & down arrows or manually type the value in the box. I'm using 1024 pixels in the above example.
Experiment with the Resize Method options. I've found Lanczos3 gives the best results.
As this is the Freeware Screenshots forum no editing is allowed so leave the Sharpen & Crop options unselected. The same goes for all options in the Additional Operations section.
In the Saving section select a location for the saved images from the Output Folder option. You can leave the Output Filename as it is. This will help when batch processing multiple shots.
Click on the 'Restrict Size' box to set the output file size limit. I've set mine to 150 KB which should keep it within the forum limit.
I suggest selecting the sRGB option. Leave the other options unticked.
To see what the saved image will look like click the 'Preview' button. Double-click on the image to see it full screen. (I recommend doing this as you will see any jaggies or other imperfections properly.) Double-click again to return to the UI.
When you're happy with the settings click the 'Run Now' button. When this option dialog box appears click Yes.
As stated this will apply your settings to all selected images & save them in JPEG format to the output folder you selected ready for uploading to the SimV server. Couldn't be easier.
This is the result using my example on the above settings. I think it compares well with images processed with more advanced software I've tested.
I'm always on the lookout for useful freeware utilities. Flying Trucker mentioned one named BD Sizer recently so I decided to check it out. Unlike more conventional graphics editing software, BD Sizer was developed specifically for processing images for posting on the Internet. A very useful piece of kit indeed. It has a few other handy features but these aren't part of this walk-through.
If you would like to try it download the current BD Sizer 3.3.0 here --> http://www.idimager.com/downloads/freeware
Installation is quick & painless. I suggest creating a desktop shortcut when prompted. Once it's set up, resizing & saving screenshots & photos for posting on this forum is quick & simple.
This is the user interface. It would normally fill the screen but I've reduced the size for demo purposes.
There is no conventional menu bar & the options are all in the side menu on the left.
(Close the right hand 'Exif Info' window by clicking on the button half-way down the left side.)
Browse & open the image(s) you wish to post from the Load Photo(s) icon at top left. The shot I'm using as an example was taken in FSX with the onboard screengrab option (V key).
It was automatically saved in BMP format at the native resolution of my monitor (1440 x 900 pixels) & will need resizing to meet the forum limit of 1024 pixel width max.
To set the resize options click the appropriate box under 'Resizing'. This will expand the menu as in the shot below.
Set the longest side to whichever width you want your shot(s) to end up. Use the up & down arrows or manually type the value in the box. I'm using 1024 pixels in the above example.
Experiment with the Resize Method options. I've found Lanczos3 gives the best results.
As this is the Freeware Screenshots forum no editing is allowed so leave the Sharpen & Crop options unselected. The same goes for all options in the Additional Operations section.
In the Saving section select a location for the saved images from the Output Folder option. You can leave the Output Filename as it is. This will help when batch processing multiple shots.
Click on the 'Restrict Size' box to set the output file size limit. I've set mine to 150 KB which should keep it within the forum limit.
I suggest selecting the sRGB option. Leave the other options unticked.
To see what the saved image will look like click the 'Preview' button. Double-click on the image to see it full screen. (I recommend doing this as you will see any jaggies or other imperfections properly.) Double-click again to return to the UI.
When you're happy with the settings click the 'Run Now' button. When this option dialog box appears click Yes.

As stated this will apply your settings to all selected images & save them in JPEG format to the output folder you selected ready for uploading to the SimV server. Couldn't be easier.
This is the result using my example on the above settings. I think it compares well with images processed with more advanced software I've tested.
